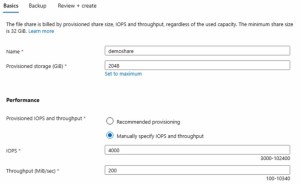
Managing Azure Files Cost has always been a balancing act between capacity, performance, and budget. Until recently, if you needed higher IOPS or throughput with Azure Files Premium, you were forced to provision extra storage—even if you didn’t need the space. That meant paying for unused capacity, and those costs could add up fast.
Microsoft has now introduced Provisioned V2 billing for Premium file shares in Azure Storage, and it changes the game. With V2, capacity, IOPS, and throughput can be scaled independently. This flexibility means you only pay for what you actually need in your Storage Account, making it easier to right-size your Azure Cloud deployments without overspending.
V1 vs. V2: What’s the Difference?
With the original Provisioned V1 model, all three elements—capacity, IOPS, and throughput—were tied together. If you needed more performance, you had to pay for additional storage. Many organizations using FSLogix or other file-based workloads often bought capacity they didn’t need to meet performance requirements.
Provisioned V2 removes that limitation. Now, you can set capacity, IOPS, and throughput separately. This opens up significant opportunities for cost savings in scenarios where performance and capacity don’t scale evenly.
For example:
– If you need more capacity but don’t need extra performance, V2 helps you avoid overpaying.
– If you need high performance but only minimal capacity, V2 ensures you don’t buy unused storage.
Real-World Cost Savings
According to Azure pricing data for the Central US region, Provisioned V2 estimates demonstrate distinct benefits.
– A 1 TiB Premium file share with 4024 IOPS and 203 MiB throughput costs around $166 with V2 versus $185 with V1.
– A 2 TiB deployment sized for capacity costs $253 with V2 versus $371 with V1.
– A performance-heavy workload requiring 7000 IOPS and 500 MiB throughput costs $280 with V2 versus $741 with V1.

These numbers highlight how V2 can deliver meaningful monthly savings depending on your use case.
Deploying Azure Files Premium V2
Getting started is simple. From the Azure Portal, create a new Storage Account and select Premium performance. Under file share billing, choose Provisioned V2.

Once the Storage Account is created, add a new file share. Set the capacity, IOPS, and throughput independently when creating the share.

One added benefit: you can modify the capacity and performance on the share, so it scales with your environment. Or you can temporarily scale up performance for short-term jobs, such as file syncs, then scale back down to reduce ongoing costs. This gives you flexibility while maintaining control over your Azure Files Costs.
Final Thoughts
Provisioned V2 for Azure Files Premium is a welcome update for IT admins and cloud architects looking to optimize cloud storage in the Azure Cloud. By separating capacity, IOPS, and throughput, it eliminates the waste of overprovisioning and puts you in control of your spending.
If you’re running FSLogix or any workload that depends on predictable performance and scalability, it’s worth exploring V2 in your next deployment.
Links:
A Beginner’s Guide to the AZ-900
https://www.udemy.com/course/beginners-guide-az-900/?referralCode=C74C266B74E837F86969
Zero to Hero with Azure Virtual Desktop
https://www.udemy.com/course/zero-to-hero-with-windows-virtual-desktop/?referralCode=B2FE49E6FCEE7A7EA8D4
Hybrid Identity with Windows AD and Azure AD
https://www.udemy.com/course/hybrid-identity-and-azure-active-directory/?referralCode=7F62C4C6FD05C73ACCC3
Windows 365 Enterprise and Intune Management
https://www.udemy.com/course/windows-365-enterprise-and-intune-management/?referralCode=4A1ED105341D0AA20D2E
Azure Pricing Calculator
https://azure.microsoft.com/en-us/pricing/calculator/
Excel Pricing Worksheet (recommend using the Azure pricing calculator):


